Tuesday, October 7, 2014

Easy Lo Mein

Easy Lo Mein
Prep Time 10 minutes
Cook Time 15 minutes
Total Time 25 minutes
Yield 6 servings
Easy Lo Mein
The easiest lo mein you will ever make in 15 min from start to finish. And it's so much quicker, tastier and healthier than take-out!
Ingredients
  • 1 pound lo mein egg noodles*
  • 1 tablespoon olive oil
  • 2 cloves garlic, minced
  • 2 cups cremini mushrooms, sliced
  • 1 red bell pepper, julienned
  • 1 carrot, julienned
  • 1/2 cup snow peas
  • 3 cups baby spinach
  • For the sauce
  • 2 tablespoons reduced sodium soy sauce, or more, to taste
  • 2 teaspoons sugar
  • 1 teaspoon sesame oil
  • 1/2 teaspoon ground ginger
  • 1/2 teaspoon Sriracha, or more, to taste
Instructions
  • In a small bowl, whisk together soy sauce, sugar, sesame oil, ginger and Sriracha; set aside.
  • In a large pot of boiling water, cook lo mein egg noodles according to package instructions; drain well.
  • Heat olive oil in a large skillet or wok over medium high heat. Add garlic, mushrooms, bell pepper and carrot. Cook, stirring frequently, until tender, about 3-4 minutes. Stir in snow peas and spinach until the spinach has wilted, about 2-3 minutes.
  • Stir in egg noodles and soy sauce mixture, and gently toss to combine.
  • Serve immediately.
Notes
*If lo mein egg noodles cannot be found, spaghetti can be substituted. 

Slow Cooker Chicken Tikka Masala

Slow Cooker Chicken Tikka Masala

Serves 4 to 6
1 to 1 1/2 pounds boneless, skinless chicken thighs
1 large onion, diced
3 cloves garlic, minced
1-inch piece whole ginger, peeled and grated
2 tablespoons tomato paste
1 to 2 tablespoons garam masala
2 teaspoons paprika
2 teaspoons kosher salt
1 (28-ounce) can diced tomatoes
3/4 cup heavy cream or coconut milk
Fresh cilantro, chopped
2 cups cooked rice, to serve
Cut the chicken thighs into bite-sized pieces and transfer them to a 3-quart or larger slow cooker. Stir in the onion, garlic, ginger, tomato paste, 1 tablespoon of garam masala, paprika, and kosher salt until the chicken is evenly covered with spices. Stir in the diced tomatoes with their juices.
→ If you have the time: Marinate the chicken in 1/2 cup yogurt for up to 6 hours. Shake to remove excess yogurt before transferring to the slow cooker.
→ If you have the time: Sauté the onions and garlic in a little olive oil until softened, then stir in the ginger, tomato paste, and spices until fragrant. This will give your tikka masala more depth of flavor.
Cover the slow cooker and cook for 4 hours on high or 8 hours on low. Fifteen minutes before the end of cooking, stir in the heavy cream. If you prefer a thicker sauce, leave the slow cooker uncovered for the last 15 minutes. Taste and add more garam masala or salt to taste.
Serve over rice with fresh cilantro sprinkled over the top of each serving. The tikka masala can be refrigerated for up to a week or frozen for up to 3 months.

Recipe Notes

  • Chicken breasts can be substituted for the thighs, though I find thighs hold up better over the long cooking and breasts tend to fall into shreds. Still delicious, though!
  • For a little of that smoky, tandoori flavor, try using smoked paprika and roasted tomatoes.

Monday, September 8, 2014

Orange Chicken

Orange Chicken

Prep Time:
Cook Time:
Difficulty:
Easy
Servings:
4

Ingredients

  •  Vegetable Or Peanut Oil For Frying
  •  Chicken
  • 4 whole Egg Whites
  • 2 Tablespoons Cornstarch
  • 4 whole Boneless, Skinless Chicken Thighs, Cut Into Bite Sized Pieces
  •  Sauce:
  • 1/2 cup Orange Juice
  • 1 Tablespoon Soy Sauce
  • 1 Tablespoon Packed Brown Sugar (OR White Sugar OR Honey)
  • 1 Tablespoon Rice Vinegar (or Regular Distilled Vinegar)
  • 1/4 teaspoon Sesame Oil
  •  Dash Of Salt
  •  Dash Of Crushed Red Pepper, More To Taste
  • 1 clove Garlic, Pressed Or Minced
  • 2 teaspoons Minced Ginger
  • 1 teaspoon Cornstarch (additional)
  •  Zest Of 1 Orange (optional)
  • 1/4 cup Water
  • 2 whole Green Onions, Sliced

    Preparation Instructions

    For the chicken: In a large bowl, whisk together the cornstarch and egg whites with a fork until almost frothy, about 1 minute. Add the chicken to the mixture and allow to sit for 5 to 10 minutes.
    For the sauce: Meanwhile, put the orange juice, soy sauce, sugar, vinegar, sesame oil, salt, crushed red pepper, garlic and ginger (and orange zest, if using) in a small nonstick skillet and whisk together. Heat until bubbling and starting to thicken, about 3-4 minutes.
    Whisk together the cornstarch and 1/4 cup water in a small bowl and add 1 to 2 tablespoons of the cornstarch slurry to the sauce. Mix in and thicken for 1 minute. (If sauce gets overly thick, just add in another 1/4 cup water and whisk in.)
    Heat about 2 inches of vegetable oil in a heavy-bottomed pot until a deep-fry thermometer inserted in the oil registers 350 degrees F. In batches, carefully drop a few pieces of chicken into the oil (drop them in one by one to keep them from sticking together) and move it around, 2-3 minutes or until light golden. Let the pieces drain on a plate lined with paper towels for 2 to 3 minutes. Then drop them back into the oil for 1 minute to really solidify the coating.
    Toss the chicken in the sauce and serve immediately with orange zest and sliced green onions on the top.
    Posted by Ree | The Pioneer Woman on September 8 2014

Wednesday, August 13, 2014

Cha Gio Cua Be (Vietnamese Crab Egg Rolls)

Cha Gio Cua Be (Vietnamese Crab Egg Rolls)

From Wandering Chopsticks Blog
For about two dozen egg rolls, you'll need:

1 lb ground pork
1/2 lb shrimp, roughly minced
1/2 to 1 lb lump crab meat
1 egg 
1 small section bean thread vermicelli. They're sold individually or in packages, but the packages will tie a small bundle together. You just need one.
1 medium onion, minced or grated
1 large carrot, peeled and grated
1 tsp salt, adjust to taste
1 tsp sugar, adjust to taste
1 tsp black pepper, adjust to taste
2 tsp Nuoc Mam (Vietnamese Fish Sauce), adjust to taste
1 package spring roll or rice paper wrappers
Oil for deep-frying 

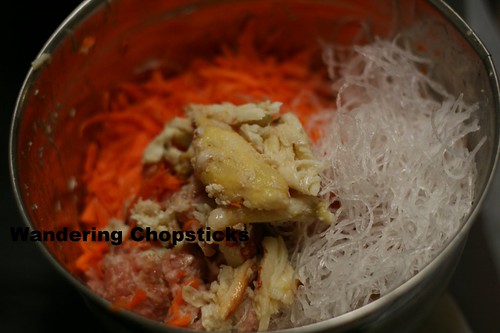
In a large bowl, add 1 lb ground pork, 1/2 lb minced shrimp, 1/2 lb or more if you can afford it of lump crab meat, and an egg.

Cha Gio Cua Be (Vietnamese Crab Egg Rolls) 3

Soak one section of vermicelli noodles in hot water to soften.

While the noodles are soaking, grate one large carrot and one medium onion. Season with 1 tsp salt, 1 tsp sugar, 1 tsp ground black pepper, and 2 tsps fish sauce. Drain and add the bean thread noodles to the bowl. Mix thoroughly, being careful not to mash the delicate crab meat.

Cha Gio Cua Be (Vietnamese Crab Egg Rolls) 4

Separate the egg roll wrappers and you're ready to wrap and roll. I did a little video to show you how. If it doesn't show up here, you can watch it on YouTube.


Prepare your wrapping station with a bowl of water and a plate to hold the finished egg rolls. Dip one corner of the egg roll wrapper in water, then add a few tablespoons of the filling to the opposite corner of the egg roll wrapper.

Cha Gio Cua Be (Vietnamese Crab Egg Rolls) 6

Fold down the corner and make sure it's tight around the filling.

Cha Gio Cua Be (Vietnamese Crab Egg Rolls) 7

Tuck in the sides. Make sure they're straight or at least a little inward on the bottom so the rolls will look uniform.

Cha Gio Cua Be (Vietnamese Crab Egg Rolls) 8

Start rolling, making sure the wrapper stays tight around the filling.

Cha Gio Cua Be (Vietnamese Crab Egg Rolls) 9

Keep rolling.

Cha Gio Cua Be (Vietnamese Crab Egg Rolls) 10

Pressing tightly on the moistened end to seal the egg roll. And done! Set aside and continue wrapper until you have at least half a dozen.

Cha Gio Cua Be (Vietnamese Crab Egg Rolls) 11

Put several cups of oil into a wok or pan on medium to medium-high heat. When the oil is hot, fry the egg rolls. You can continue wrapping the rest of the egg rolls while watching to make sure the frying egg rolls don't burn.

Cha Gio Cua Be (Vietnamese Crab Egg Rolls) 12

Drain on a clean paper bag or paper towels. The paper bag has less moisture than the paper towels, so the egg rolls will stay crispy longer, but either will do.

Cha Gio Cua Be (Vietnamese Crab Egg Rolls) 13

Decadently delicious crab egg rolls.

Cha Gio Cua Be (Vietnamese Crab Egg Rolls) 14

And these? It's my little experiment to see if I could bake egg rolls that taste almost as good as fried. Can you tell which is which?

Cha Gio Cua Be (Vietnamese Crab Egg Rolls) 15

Enjoy!

Read more: http://wanderingchopsticks.blogspot.com/2010/12/cha-gio-cua-be-vietnamese-crab-egg-rolls.html#ixzz3AI9ceAUH

Read more at http://wanderingchopsticks.blogspot.com/2010/12/cha-gio-cua-be-vietnamese-crab-egg-rolls.html#HS7H2wjsw8saUWzR.99

Wednesday, August 6, 2014

Thai Fried Omelet

Thai Fried Omelet


Paige Green © 2014
With two eggs on hand, you can make a fried egg banh mi (banh mi trung) -- breakfast for many people and my own favorite anytime food. The default is to make sunny-side up eggs or a French-style omelet, but I like to fry the eggs Thai style, in hot oil, for a fluffy, golden brown omelet with a bit of crispness. It's brilliant, simple cooking.

  • 2 pinches of black or white pepper
  • 1 teaspoon cornstarch
  • 1 teaspoon fish sauce or soy sauce
  • 1 teaspoon water
  • 2 large eggs, at room temperature
  • 3 to 4 tablespoons canola oil
In a bowl, stir or whisk together the pepper, cornstarch, fish sauce, and water. Add the eggs and beat or whisk well to combine. Set aside.

Heat a wok or a small nonstick skillet over medium heat. Add oil to thickly film the bottom (thick as a bean sprout). Heat until the oil is very hot, nearly smoking; a drop of egg dabbed into the oil should immediately sizzle and bloom.

Pour in the egg (from as high as 12 inches / 30 cm if you love drama). It should spread and puff like a self-inflating raft. Use a spatula to pull and push the edges toward the middle, allowing excess egg to flow out into the oil to expand the size of the omelet. Expect a crazy shape and uneven texture.

When the omelet has nearly set (it's still wet but not jiggly), raise the heat to medium-high or high. Fry for about 1 minute, until the edges are golden and the bottom browns a bit. Use one or two spatulas to flip the omelet over. Cook for 30 to 60 seconds longer, or until the bottom picks up some browning. If you like, briefly refry the first side. 

Drain and cool the omelet on a rack. Blot excess oil with paper towels, if you like, then fold it over before sliding into bread for banh mi.

Notes

Let this omelet fly solo in a Thai fried omelet banh mi with all the fixings, or use it with another filling, such as the grilled portobello or the sardine and tomato sauce. Make 3 or 4 omelets for a round of banh mi lettuce wraps, cutting the omelet into bite-size pieces and drizzling on some spicy hoisin sauce.

Revive a cold omelet in a toaster oven preheated to 375°F (190°C) for 5 to 6 minutes, flipping midway.
Reprinted with permission from The Banh Mi Handbook by Andrea Nguyen, copyright © 2014. Published by Ten Speed Press, an imprint of Random House LLC.
Tags: 
eggs
Total time: 
Takes 5 minutes
Yield: 
Makes enough for 1 sandwich

Spicy Tuna Poke

Hawaiian Spicy Tuna Poke

For about 2 servings, you'll need:
1/2 lb sashimi-grade tuna, cubed
1 large shallot or 1/4 Maui or red onion, thinly sliced
2 green onions, thinly sliced
1 tblsp soy sauce
1 tblsp chili sambal
2 tsp Sriracha
1 tsp sesame oil
1/2 tsp salt
2 tsp sesame seeds, toasted
1/2 cup seaweed salad 

Wash and pat dry with paper towels about 1/2 lb of sashimi-grade tuna. Slice into 1-inch cubes. Set aside.

Hawaiian Spicy Tuna Poke 3

Thinly slice 1 large shallot and 2 green onions. Add 1 tblsp soy sauce, 1 tblsp chili sambal, 2 tsp Sriracha, 1 tsp sesame oil, 1/2 tsp salt, 2 tsp toasted sesame seeds, and 1/2 cup seaweed salad. 

Hawaiian Spicy Tuna Poke 4

Mix thoroughly and leave to chill in the fridge for about half an hour.

Hawaiian Spicy Tuna Poke 5

Or if you can't possibly wait, eat right away.

Hawaiian Spicy Tuna Poke 6

Served with rice.

Hawaiian Spicy Tuna Poke 7

Enjoy!


Read more: http://wanderingchopsticks.blogspot.com/2014/07/hawaiian-spicy-tuna-poke.html#ixzz39e9hSFFy

Read more at http://wanderingchopsticks.blogspot.com/2014/07/hawaiian-spicy-tuna-poke.html#mfIvoFbUIwZW11Ev.99

Salmon Poke

Hawaiian Salmon Poke

For about 2 servings, you'll need:
1/2 lb sashimi-grade salmon, cubed
1 large shallot or 1/4 Maui or red onion, thinly sliced
2 green onions, thinly sliced
1 small tomato, diced
1/2-inch knob ginger, finely grated
1 tblsp soy sauce
1 tsp sesame oil
1/2 tsp salt
1/3 cup seaweed salad
1 tsp Korean red pepper flakes
2 tsp sesame seeds, toasted

Wash the salmon and pat dry with paper towels. Cut into 1-inch cubes. Set aside.

Hawaiian Salmon Poke 3

Thinly slice one large shallot and two scallions. Dice one small tomato. Finely grate a 1/2-inch knob of ginger. Add 1 tblsp soy sauce, 1 tsp sesame oil, 1/2 tsp salt, 1/3 cup seaweed salad, 1 tsp Korean red pepper flakes, and 2 tsp toasted sesame seeds. 

Hawaiian Salmon Poke 4

Mix thoroughly and set aside in the fridge to chill.

Hawaiian Salmon Poke 5

Or if you can't possibly wait, eat right away with some rice.

Hawaiian Salmon Poke 6

Enjoy!


Read more: http://wanderingchopsticks.blogspot.com/2014/07/hawaiian-salmon-poke.html#ixzz39e96tkyw

Read more at http://wanderingchopsticks.blogspot.com/2014/07/hawaiian-salmon-poke.html#UUSjQsEGx2oqOjRx.99